Saturday, November 26, 2011

Review: Tacx Flow Computer Ergo Turbo Trainer and PC Upgrade

My beautiful and shapely wife loves to cycle. It helps to maintain her youthful figure. She looks so young that whenever I ride with her, people commented; "Bagusnya bapak dia, temankan anak dia kayuh basikal." (Very good of the father, to accompany his daughter cycling).

Keeping her company during rides was not a problem except during Ramadan since we can only start riding after 10 p.m. due to tarawikh prayers. Turning in at midnight, waking up at 4.30 a.m. for sahur was not a good idea, since I would be walking like a zombie the next day.

In August 2010, with Ramadan approaching on 11th August 2010, I decided to buy a bike trainer for her as our 19th anniversary gift, then that she could continue to ride during Ramadan. A bike trainer allows you to ride your bike without having to venture out into the dark night or during poor weather.

To choose the best possible model, I referred to the inaugural issue of Cycling Asia (Nov/Dec 2009). Two models were highly recommended in that issue. They were;

One of the BJCC riders (Boon Foo's best customer!) bought the iMagic model for just above RM4000 in June 2010. Although the review sounds impressive, it was way beyond my measly budget.

So I opted for the second model, TacX Flow. Later once I could afford it, I could buy the PC Upgrade which would turn the TacX Flow into the iMagic model since both utilises a similar turbo trainer. Only the interface/software is different between the two models. Another TacX trainer model which could also be upgraded into the iMagic model is the TacX Cosmos.

So I went and bought the trainer from Boon Foo's Pro Bike Shop on the 6th August 2010. Initially I got lost since I didn't know that his shop moved just before the 2010 PCC Interstate Ride. With guidance from Prof Sani via phone, I found Boon Foo's new place (N3.11645 E101.61259).


The list price was almost RM2.4K. When I told Boon Foo that I am a friend of his best customer, he gave me a 20% discount. :D

Setting it up was easy once I learnt to ignore the instructions in the manual. Instead I relied on the images in the manual instead. For the bike, you only need to change the rear wheel skewer with the supplied quick release skewer, otherwise your bike will fall out of the trainer. It was easy to put in and take out the bike due to the quick release on the trainer. Fitting the cadence sensor,head unit display and assorted wires was a bit messy though. A wireless system (like TacX Bushido!) would be a nice change.

Once up and running, the Flow is smooth and quiet, and the frame felt stable with no wobble even at high speed. To ensure quiet running, I used "road-slick tyre" on the rear wheel. Using a "semi-slick tyre" would cause a weird humming sound. It was so quiet that now I have the trainer installed in my bedroom. My wife could ride it at night and it won't disturb my sleep at all.


Resistance feels good and is more than adequate for training purposes. The head unit is fairly intuitive and the display is large enough to see. The resistance is set based on the gradient or the power setting. You can change the gradient of the ride from minus 4 up to plus 9 (minus for descents, 0 for flat, plus for climbs). But changing it yourself while riding takes the fun out of it. Felt like cheating since you were more likely to change it to 0 once you couldn't cope with the climb any more. Please note that the resistance is simulated. Resistance +9 does not correspond to an actual incline of + 9 and resistance - 4 does not correspond to a 4% descent. It goes without saying that at - 4 the trainer will not freewheel if you stop pedalling.

Or you can set the power setting. Once you set the power setting, the computer will adjusts the resistance on the roller so that you will continually pedal at your original power setting. If you change pedalling frequency or resistance, the computer will immediately adjust the resistance on the roller. You can set the power between 10 and 990 Watt, in increments of 10 Watts. At 100 watts, cycling feels pretty easy once you hit above 25 km/hour.

Although the head unit displays the heart rate of the rider, the TacX Flow do not come with a heart rate transmitter. Instead you have to buy it separately. The manual recommended that you to buy the Polar T31 Transmitter/Electrode Belt Set - Non Coded. However my Polar Wearlink Coded HR transmitter that comes with my Polar S725X does work with it. Even the HR transmitter from Cat Eye Dual Wireless Cyclometer & Heart Rate Monitor CC-HR200DW seems to work with it. But my wife's Polar Wearlink W.I.N.D. HR transmitter that comes with her Polar RS800CX does not work with TacX Flow. It is stated in the manual that the Suunto transmitter belts (ANT) and Polar W.I.N.D transmitter belts are not compatible with Tacx trainers.

All-in-all this is an excellent product which is helping to motivate my wife to increase her fitness. The only downside is the boredom whilst training. The most that I could do on the trainer was 25km in one session.

A year after buying the TacX Flow, it was very much under-utilised. It was "not fun" riding on the trainer, unlike riding on the road. So to avoid it from becoming a white elephant in my house, I decided to get the PC Upgrade from Wiggle as her 20th anniversary gift. I got it for only GBP180 (RM890) with free delivery. It arrived 11 days after ordering.

I just have to exchange the head unit of the TacX Flow with the new iMagic head unit. Then I installed the software on the home computer which is running on Windows XP. I was immediately disappointed. The installation and upgrading of the TacX Trainer Software (TTS) needs to be improved. They should ship it with the latest version of TacX Trainer Software (v3.6). Currently you have to install version 3.0 first, which comes in a CD with the new head unit. Then you have to download v3.1, then install to upgrade. Then repeat the same steps for v3.2, v3.3, v3.4, v3.5 and lastly for v3.6 to finish the upgrading. Why can't I just download the full v3.6 and install it straight away? The upgrade procedure really needs to be improved.

But once you've finished installing and upgrading it, everything is hunky dory again. To ensure that my wife will get the full benefit of the new virtual reality trainer, I also bought a 32 inches LCD TV to connect to the PC for RM900 from Giant Shah Alam. That was the biggest TV that I could install in my bedroom without hindering access to the bathroom ;)


I ended up spending more than RM5.5K, excluding the cost of the bike and internet access. Quite a huge investment, a lot more than what I paid for my wife's road bike.

However riding on the TacX Flow trainer now is so much fun.


There are 6 possible training modes with the PC Upgrade as you can see in the image above;

  • Catalyst consists of professional training programs for scientific analysis. There are three different program types (slope, watt and heart rate) adjustable for distance (in 100 meter increments) or time (in 10 second increments).
  • Real Life Videos were specifically shot for the Slope/Distance workouts. The film's speed is influenced by your tempo. When you are riding uphill the brake will generate so much resistance that you can really feel the incline.

  • ErgoVideo stands for power training with the pros in Watt/Time. It's a very efficient way to improve your fitness and cycling technique over a remarkably short period.
  • Real Life Training - You can upload GPS tracks of your previous rides and ride them again on the trainer. Courses that you have personally ridden can be repeated, thanks to Google Earth. It's life like, but without the inconveniences of riding outside. With the help of the 3D maps you can also ride courses you would never dream of going to. You can copy a real ride or create one with the route planner. Makes planning and training for rides a breeze. Below is route created from the January 2011 LeTua 100 GPS tracks.

  • Virtual Reality - You can ride inside a pre-programmed course with five VR terrains;

    1. Atlantis - road terrain for road cyclists and mountain bikers through dunes, along pastures and villages
    2. Callisto - mountainous terrain for mountain bikers and road cyclists featuring many turns and short climbs
    3. Extreme mountainbike - an adventurous terrain, demanding the utmost from your steering
    4. Olympus - mountainous terrain with tough climbs for road cyclists
    5. Velodrome - a cycling track with real competitions, day and night

    The virtual reality trainer is an acceptable mode of training but be prepared to be nauseated due to it's lack of smooth turning.
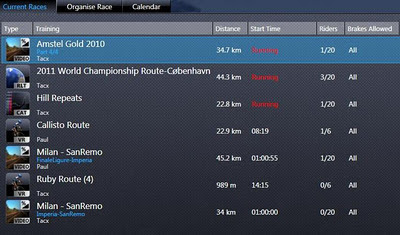
  • Multiplayer allows you to race against real opponents, anywhere in the world, thanks to the internet or a local network. In Virtual Reality this can be done with 5 opponents, with the other training types it is possible with up to 19 opponents. With the upgrade to version 3.6, you can only join races created by TacX servers. No longer can you create your own races. I don't really mind since I lack the confidence to join such races :). If you're interested in such races, you can check out the promo video below;


But to me, the best of all the above is the real life video training routes. It is really fun to ride the video routes. Although the demo version is only 3.9km, everyone who drops by my place, rides it again and again.

I wanted to share the experience of riding the demo real video route on the TacX trainer. I included my wife's and my previous best attempts as virtual competitors during this ride. With no warm-up, I started the ride at top speed. I ended up injuring myself and ended watching the 3 virtual competitors leaving me far behind. You can watch that video below;


You can buy the real life video training routes from TacX itself.

They have;
  • Cycling classics
  • Mountain stages
  • Training with the pros
  • Cycle tours
  • City trips and
  • VR games

Each video is around 35 euro which is about RM150. Quite cost effective. For example, it will set you back more than RM15,000 in fare, lodging and guide fees to ride the Stelvio in real life. Forking out only RM150, will allow you to ride the Mortirolo (1,851 m), the Stelvio (2,758 m) and the Passo di Gavia (2,621 m) on your trainer. No need to pack your winter ride clothing!


Inaccuracy of Speed & Distance Displayed

If you check out the forums, there are a lot of comments on the inaccuracy of speed and distance displayed on the TacX trainers. To check it out, I rode a short 16.48 km real life video route and compared it with the distance recorded on the Polar watch.

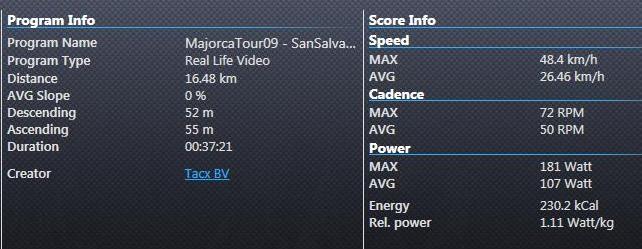
It is possible to compare since I installed the speed sensor on the rear wheel instead of the front wheel. The watch recorded only 13.62 km distance.


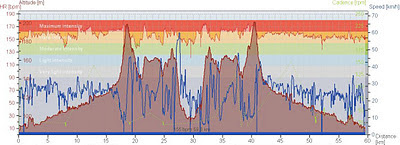
The speed during ride also varies especially whenever I am going downhill. The TacX Trainer Software (TTS) would be displaying a speed of 50km/hour while the watch was showing a speed of only 20km/hour.

This is due to a "software trick" to compensate the fact that the trainer's roll will not turn by itself during a descent in the terrain, like it would in real life. So the software engineer has introduced "virtual speed formulas", in order to imitate reality as much as possible the rider's speed is artificially increased during descents and decreased uphill. As a result of this application the speed indicated on the screen will in many cases be superior to the actual riding speed. This will also affect the actual distance travelled as displayed on the TTS screen. This is explained in the manual. I guess not many users/reviewers read the manual :D.

Conclusion

My wife rides the trainer daily nowadays. I'm riding it almost every night. So the TacX Flow trainer is no longer a white elephant since now it is fun to ride. I can choose the distance and type of terrain that I want to train on and I will try to finish it. This RM890 investment for the TacX PC Upgrade gave me the best return in cycling. I hope to be a better and stronger rider in the near future. Boon Foo's best customer summarised it better with this remark; "Buying it is the easy part. Staying motivated enough to ride the thing which essentially goes nowhere... now that's the challenge."

Monday, November 21, 2011

Tips for a Roadie Newbie

Yesterday I "baby-sat" a new rider on his maiden 60 km group ride. The 10 members of the group consisted mostly of his work mates.


The newbie rider has a loving and generous wife who bought him

  • a nice carbon road bike (only 7.3 kg!),
  • complete with helmet, gloves,
  • cycling shoes with cleats, Look clip-on pedals,
  • bottle cage, water bottle, saddle pouch,
  • jersey and cycling bib for his birthday.


Of course the wife was clever enough to get the advice of well-informed co-conspirators!. The birthday boy completed the 60 km Bt 14 Hulu Langat to Sg Tekala and back route under his own steam, which is pretty good for a newbie. I myself was huffing and puffing along the way. I really need to lose some weight!


Although the above items seem complete, there were a few items missing from the birthday boy's saddle pouch.

  • Must have items; spare tube, bike pump & tyre levers.
  • Good to have; cyclecomputer (if possible complete with speedometer, HRM & navigation aid).
  • Nice to have; a bike rack on your car and a good rain coat.


During the maiden ride, we had 3 tyre punctures, due to poor road conditions. I was one of those who had to replace his tyre inner tube during the ride home. The first one occurred much earlier, about 2 km before reaching the T-junction at Sg Lui. There was a delay in getting the first tube replaced due to a broken air-valve of the spare tube. The rigid hand bike pump and unskilled hands led to the broken air-valve. So a good hand bike pump is necessary. I have went through many hand bike pumps to date. For me, the best would be a model with a flexible hose to avoid breaking the air-valve, yet able to pump above 120 psi in a short time. Based on my reading, I bought the Lezyne Pressure Drive exactly two years ago.


Two years and many inner tube replacements later, I still swear by this hand bike pump. With this bike pump, I'll be up and riding again in a very short time. The aim is to get it done before the last rider of the group is already beyond the horizon, otherwise I'll be hard pressed to catch up.

You'll also need a tool to remove the inner tube. Previously I used the Topeak Alien Multitool which I had since 1991.


But it is like getting an atom bomb to kill a mosquito if you buy it just to remove the inner tube. But it is nice to have all these tools with you while riding. When the spoke of my my rear rim broke 6 weeks ago, the multitool came in useful to remove the broken spoke. Otherwise there was no way I could ride home that day.

So nowadays I use Park Tools Tyre Levers to remove the inner tube. So tough that you don't worry about breaking them. I think I bought 6 of them, a pair for each of my three bike pouches.

You also need to have a spare tube or two in your saddle pouch. I always carry two spare tubes due to my tendency to suffer tubes blowup during long rides. Must be due to my weight, because whenever I hit a pothole wrong, there will be a very high chance of a tyre/tube blowup. The weight weenies ends up buying lightweight tubes priced RM46 and above. I feel that it is better to buy the normal 700x25c tubes at RM12-RM15 each. Try to get MAXXIS tubes. Make sure the length of the air-valve is suitable for your rim. A high profile rim will require an extended valve or a valve-extension.


As for the HRM, speedometer, navigation aid combo; the best is to get the Garmin Edge 800 performance bundle. It has a built-in basemap and tracks your distance, speed, location and ascent/descent. It also comes supplied with the ANT+ heart rate monitor, speed/cadence sensor. Buy an 8GB microsd card and you'll be able install USA, Europe & SEA maps in it. Then you can also use it to get around during your overseas holidays. Most of the PPUKM riders that I know, got it from ebay. BJCC riders prefer to buy it from Wiggle.

I myself uses Polar s725X+HRM+speed sensor+cadence sensor. It was a big investment for me so I refuse to upgrade further. For my wife, I bought the Polar RS800CX+HRM+Speed Sensor. A much better one than mine.

Having a bike rack will make transporting your bike around much easier. The best is to get Thule roof bike rack. For those with carbon bikes, please remember to get the Outride model, not the ProRide model. I use ProRide bike racks since all my bikes are aluminium bikes. I wrote about alternatives to Thule bike rack before but in the end I myself uses Thule bike racks. Thule is a much superior product than other wannabe brands.

If you've some cash to spare, please do consider getting a good rain coat to ride in the rain. I myself bought the Gore-Tex Rain Jacket from Wiggle. I tried to get it locally since April from a local dealer but still no sign of it 6 months later. I bought it because it has excellent waterproofing, warmth and at the same time packing down into a small size to fit into my jersey pocket. Additionally the Gore Tex material means that the jacket remains highly breathable to prevent me from sweating (while riding in the rain!).

Any more tips for newbies? Please use the comment box to give your suggestions.

Tuesday, November 15, 2011

My First Century Bike Ride

A century ride (100 miles=161km) is a major accomplishment for a cyclist. Despite having bought my first road bike more than 2 years ago in February 2009, I have never been tempted to do so. The furthest ride I ever did was 103 km in May 2010 and it was an experience that I did not want to ever repeat. With a body mass index (BMI) of 31 kg/m2, I am obese, therefore it is a bit hard to lug this tub of ghee (lard is not kosher!) around, especially on that small saddle. Yet somehow I was sweet-talked by the Bukit Jelutong Cycling Club (BJCC) members into signing up for the Ipoh Century Ride, organised by Kelab Roadrunners Ipoh (KRI) on the 17th July 2011. Below is the screengrab of the online discussion persuading me to sign up. I really fell for it; hook, line and sinker!


Preparing my body for the ride

The main principle of training for a century is to increase your mileage gradually over a number of weeks. By doing it that way, you help avoid injury, burnout and over-fatigue. When I agreed to join the ride on the 24th May 2011, it was 8 weeks to the day of the ride. But I would be away in Toronto for two weeks in June, coming back only 2 weeks before the ride. So I started training daily, to the extent of keeping my MTB in the car, so that I can ride in my working clothes while waiting to pick up my daughter from school in the evening. Whenever possible, at night I drove to Bukit Jelutong so that I can rack up the mileage by riding along the well-lighted streets. I also started riding with "Grup Haluan Kiri" (GHK) clique of BJCC, learning to ride in formation and in a peloton. With them I started riding further and faster. When I rode with the GHK BJCC from Bukit Jelutong to Kuala Selangor on the 29th May 2011, it really pushed up my confidence since was my personal best ever for longest distance (112.5km) and fastest average speed (27.1 km/hr). From Bukit Jelutong to Kuala Selangor, the average speed was 30.1 km/hr! Not bad for a morbidly obese person!

Below is a screengrab of that Kuala Selangor ride (brown=altitude, blue=speed, red=HR);


BJCC, under the guidance of Captain Razali Mantis also organised weekly rides to ensure that the riders were ready to tackle the century ride. The training went well until 18th June 2011, when I had to depart to Toronto to attend a research meeting. There was a long layoff from training until I arrived back in early July. I started training in earnest again, taking leave from work whenever possible so that I could find time to ride. Despite all my attempts, I only managed to ride 19 times before the ICR. Boy, was I in trouble!

Here is my training log for ICR;

Preparing my bike for the ride

To make sure my bike was ready for the ride, I sent it to Hee Hong Bike Shop in Taman Nirwana on Tuesday 12th July 2011 for servicing, after my morning ride. I picked it up back the next day, along with four packs of Powergel, so that I could test it out on the road on Thursday 14th July 2011. Although it was raining on Thursday morning, I still rode the full loop of GCE with the bike since I needed to test it out. It was a nice weather for a slow and easy ride with the sun out of sight, drizzling rain and cool wind at 27 degrees Celcius.

The tyres were in good shape and inflated to full pressure. The brakes were properly lined up and worked as expected. The pads were hitting the centre of the rim, not the tyres nor under the rim toward the spokes. The gear shifting was working smoothly. The wheel were spinning true and no rattling sound anywhere except from my knees ;-)

Glad to say that the bike passed the test with flying colours!

I also checked my bike repair kit in the saddle bag, ensuring that my 2 spare tubes, tools and bike pump were present and in working order.

Preparing the logistics for the ride

Luckily for me, BJCC is fantastic at organising their participation in any cycling events. The vice-president and his cohorts collected the registration fees, sent in the registration forms, booked lodgings and organised the transport to and fro. They even picked up the riding kits and timing sensors on behalf of the participants from the organisers!

They even had a sponsor, Fusion Excel. With their sponsorship and the help of Ciclista, all 32 BJCC riders riding in the ICR were suited up in a beautiful jersey adorned with the Fusion Excel logo.


All 32 riders also received one Quantum Power Bracelet each. Fifteen lucky riders also received;
I was one of the lucky fifteen! I wore both the Quantum Power Bracelet and the Quantum Pendant during the century ride.

We need to eat and drink a lot of water during a century ride. We need to eat before we were hungry and drink before we were thirsty. Since this was an organized ride, KRI would have rest stops with food and water at almost every 40 km (km 48, 75, 104 & 144). They had bananas, isotonic drinks, bottled water and cooling stations at almost every rest stops. I also brought 4 PowerGel and two water bottles which I need to refill regularly. Initially I wanted to bring my 2.5 litres Camelbak with me during the ride but Taufik reassured me that there will be regular rest stops, so I left the Camelbak behind. Getting dehydrated is one of the most common problems on long rides so we need to avoid this.

The night before we travelled to Ipoh, I created the route of the ride based on the tracks of the test ride done 2 weeks earlier. Then I uploaded the route of the ride into my Garmin GPS60CSx.


Prof Sani was kind enough to give me a lift to Ipoh in his Hyundai Trajet MPV.

The Ride

After suboh prayers, the BJCC riders rode 10km to the starting point from our overnight lodgings. The ride started at 7 am. My riding plan was to ride with the GHK clique but somehow I got separated from them and I ended up behind Alwi. You can only stick together if you have similar fitness level and experience; and Alwi is way beyond my league. I tried to keep up with Alwi but I lasted only the first 27km. With an average speed of 40km, my heart rate was in the 170s, even hitting 179 bpm. You can see from the picture below how tough it was for me to keep up with the pace.


Not surprisingly I ended up with leg cramps after only 27km of the 161km ride.


I consoled myself that the first rest stop was only 10 km away, but it turned out to be almost 20 km away. I continued to plod on alone until I reached the first rest stop at km 48. After refilling my water bottles and gorging myself on bananas and one of the PowerGel, I was about to ride off when Zali from GHK BJCC arrived. Apparently he got dropped from the main GHK peloton.


I waited for him and we took turns to lead the 2-man peloton. At Jalan Parit (km 59), Zali told me to tag behind a young Chinese male, but he did not take kindly to that and started sprinting. I kept pace with him for 4 km although he was going up to 42 km/hr when he suddenly slipped behind another rider and I had to overtake. Then he tagged behind me and I kept a steady pace above 30 km/hr. When he got bored 2 km later, he overtook me and asked; "Where is your friend?" That was when I realised that I had lost Zali.

I continued on and reached 70km mark at 9.26 am, more than one hour before the cut-off time. Those who reached here after 10.30 am will have their timing chip taken and will be asked to turn back via a shorter route (chicken loop). I rode on to the second rest stop at km 75 and had my first experience of being soaked with cold water. Oh God, it was a heavenly feeling. Thank you KRI volunteers! Unfortunately my earphones no longer works after that. Instead there was a weird humming sound emanating from the earphones. Again I refilled my water bottles and gorged myself on bananas and my second PowerGel.

Then Keat Wong caught up with me kept me company until Kampung Simpang Tiga, when he dropped me at the start of the climb. This was when I noticed a thin girl in green who was on a S-Works bike with the number of A018, riding with the TV3 team. Since category A was for guys younger than 40, I commented on that and she frowned at me. Hehehehe.....

I caught up with the GHK BJCC main peloton at the first big climb (km97). Shahirudeen flagged me down as I was passing by. One of the GHK members suffered cramps at the first of the 3 big climbs, the Dragonbacks of Ipoh (please refer to the vertical profile below), so they stopped to help him recover. When I arrived, they were about ready to continue but I was in no shape to follow them.


As I come down the first twin peaks, I was going down so fast (58 km/hr) that the momentum pushed me over the second big climb as well. As I was arriving at the third and final climb (km 102), most of the riders got off their bikes and pushed (TNT - Turun N Tolak!), but not me! Foolish me kept on riding up that steep climb. I was okay until halfway through the climb when I suddenly suffered cramps on my left thigh. Luckily I managed to unclip from my pedals in time, else I would've keeled over. Followed by cramps on my right thigh. Imagine that, I was having cramps of both my thighs, with my bike between my legs on a steep ascending gradient, unable to move at all. Luckily Wan Mustafa of GHK and another rider came to the rescue and helped me off my bikes. Later he kept me company until the third rest stop at km 104. This rest stop was located at the Kampung Chopin Kiri Community Centre.

At that water station, there were only drinks available. No cooling station. The few bananas left was located beside the female rider that I kidded earlier for riding in the wrong category (the SYT dressed in green, bike number A018). She passed me 3 bananas, but I took only two of them. She insisted, saying that I'll need one banana for each half hour of cycling. I replied saying that I need a miracle for me to finish the ride, not bananas. She laughed and said;"You better start praying then!".

I asked the community leader for permission to use the toilet at the community hall. I used that opportunity to drench myself with a tub of water. I walked out dripping wet and pushed my bike with Wan Mustafa over the timing chip sensors.

When I tried to get on my bike, I suffered severe cramps of my left lower limb. I waved off Wan Mustafa, telling him to continue the ride without me. If the sweeper lorry was there and then, I would've swallowed my pride and got onto it for the 60km ride home. Instead I swallowed the contents of my third PowerGel and gingerly got onto my bike. I learnt to start the ride without fully getting onto the saddle so that I wouldn't stretch my calves, triggering another leg cramps attack. I was riding alone the last 60 km, slowly and struggling to keep away the leg cramps. Riding at the lowest possible gear, sparing one limb, then the other, just to avoid another leg cramps. The terrain was not helping either since it was like riding over a rolling plains, with its ups and downs. At that moment, my spirits were pretty low and I had little hope of finishing the final 60 km.

Yet I still kept on riding, not stopping because I didn't know whether I could get back on the saddle. Eating one banana every half an hour as advised, drinking sparingly but regularly from my water bottles.

Almost 30 km later, the miracle that I prayed for, suddenly happened! Suddenly all the cramps went away. My body felt refreshed and I pushed on at a good pace of 30km/hr. Till that moment in time, the Quantum Power Bracelet and the Quantum Pendant that I wore, were nothing more than dead weight. Maybe somehow the positive flow of energy helps to maintain energy balance and restored the energy that has become weak in the body. I really don't know. All this mumbo jumbo is not possible to be tested scientifically nor statistically.

The picture below, taken at 12.24 pm near Taman Pelangi, captured me during that moment, 31 km away from the finishing point. The moment that I got my second wind.


I caught up with Shahirudeen after Batu Gajah but I pushed on ahead instead of cycling with him, very unsporting of me. Sorry Deen! I shouted at Deen that I was the last BJCC rider, not knowing that Zali still persisted in riding despite suffering numerous cramps.

Upon reaching the fourth and final rest stop at km 144 near Perak Herbs Garden, both firemen holding the two fire hoses showered me as I was riding in, nearly pushing me off my bike. I refilled both my water bottles and ate the offered bananas. I also took my last PowerGel. With 15 km to go, I was suddenly confident of finishing the ride.

I caught up with Pak Nyan of Gedebe Cycling Club 12km from the end but Pak Nyan declined my offer of riding with me. I was on a roll and rode on at a good pace to the finishing point at Dataran Ipoh. I finished the ride in 6 hours 38 minutes. Not bad for my maiden century ride. When I turned in my timing chip, the organisers returned my deposit and gave me a beautiful finishers' medal. My most beautiful medal ever!


Turned out that I was the third last among the BJCC riders since Deen arrived a few minutes after me. Zali arrived much later.

A018 turned in a much better time at 6 hours 18 minutes, 20 minutes earlier than me. Prof Sani utilised a "non-stop strategy" and finished in an amazing 5 hours and 15 minutes. Prof Bond did it in 5 hours 36 minutes and he is 64 years old! All the other BJCC riders posted very reputable times as listed below;

The icing on the cake, was when I found out that I came in much earlier than my school senior, JB, a century ride veteran, who did it in 7 hours 1 minute :D.

Out of 1021 riders that signed up, 869 finished the ride. Only 152 riders didn't complete the ride. That was very good indeed.

One of the BJCC riders, Haji Jalil wrote after the ride; "It was my first century ride and it was a humbling experience. I thought I could easily went sub 6 hours but man...it was really tough. I managed to complete the ride but my time was 6hrs 20 minutes and this was after a few bouts of muscle cramps and in fact the whole body was cramping and not to mention the pain in the @$$ after 6 hours on the saddle under the hot sun. I realised that you really need to train hard for these kind of ride and I admire our BJCC boys and men that went below 5 hours and to Prof Bond who at 64 years did it under 6 hours. You guys are GREAT.

Below is the screengrab showing my performance during that century ride (brown=altitude, blue=speed, red=HR);


Below is the vertical profile of the ride;


For those interested in having GPS tracks of the ride, please click here to download it. You can view it in Garmin Mapsource (Windows) or Garmin Basecamp (Mac). You can even upload it into your trainer such as TacX Fortius/iMagic/Bushido or Computrainer.

Conclusion

It was great to achieve that milestone as a cyclist. Although I was riding a cheap aluminium road bike (RM2K), I was able to do so with the right preparation and support from the BJCC members. I hope to achieve better time in future century rides.

Luckily for me at the end of this century ride, I didn't have to ride back to the lodgings. Prof Sani picked me up at Dataran Ipoh and sent me straight home to Shah Alam, using his favourite "non-stop" strategy. Thanks Prof!

Credits: The pictures above were taken by Prof Sani, Alex (KRI Cycling Club) and Andrew Chuah.